Control Points (GCPs and CHPs) File Format For Data Processing
We’ve made it as easy as possible for you to upload your control point coordinates no matter what type of control point marker you use
All you need is a simple text file (CSV), in addition to your photos, for processing. You or your survey team will be able to create this text file in a couple of minutes!
DataHub accepts two types of control points:
- Ground Control Points (GCPs)
- Checkpoints (CHPs)
You may know more about them in the following article:
FAQ: What Are Control Points (GCPs And CHPs) And How Do I Lay Them?
How to Format Data in your Control Points File
The control points file should be a .csv file format containing the following headers:
name, type, y, x, z
or
name, type, lat, lng, alt
- "name" - the name of the control point
- “type” - GCP or CHP
- "y" or "lat" - Northing or Latitude value
- "x" or "lng" - Easting or Longitude value
- "z" or "alt" - Orthometric Height (Elevation) or Height above the ellipsoid
Use the following example as a guide:
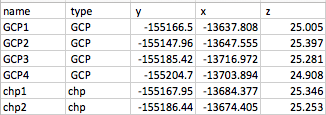
In the above example, planar coordinates were used which is why the labels y,x, and z were chosen instead of lat, long, and alt. Control points "GCP1 - 4" will be used as ground control points while control points "chp1 - 2" will be used as checkpoints.
You can download the following example files to use as a template for formatting your control points. Simply replace the data under the headings row with your own data:
Note: The uploader only accepts a .csv file extension for control points. Mac users can right-click a file folder and select "Rename" to rename the file extension. Windows users can follow the instructions provided here to rename their file extensions.
Still, Having Trouble?
Send us a message at support@skycatch.com!
Comments